- We recommend
that you engrave a sample of the logo when you receive it.
- Always turn
off your engraver before plugging in or pulling out a cartridge.
- Pull up the
lever at the end of the socket to release any existing chip. Remove
the chip from the socket.
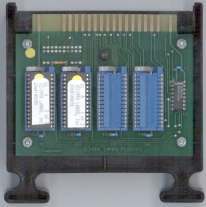
- The sockets
are numbered from left to right U1, U2, U3, U4. Place the logo chip
in the first socket (U1), and push the lever down to lock the chip
in place.
- Place the chip
in the socket with the yellow dot on the end of the chip toward
the gold contacts on the cartridge. Failure
to do so will cause permanent damage to the chip!!!
- Some logos
require more than one chip. All the chips must be used to make the
logo work. Place the #1 chip in socket U1, #2 chip in socket U2,
#3 chip in socket U3 and the #4 chip in socket U4.. Never skip a
socket.
- With the engraver
off, insert the cartridge into any of the open cartridge slots.
Turn the engraver on.
- Set up the
engraving program like you normally would. From the composition
screen, move the cursor to the font selection. Type in LL (for Lamro
Logo). Move the cursor to the input text line at the bottom of the
screen. Type the capital letter A to represent the logo on the text
line. Press start and finish your setup to engrave.
- NOTE: Only
one logo can be accessed per cartridge.
- This is an
OPEN TOP cartridge. The open side goes UP.
 |